for beginning of the line, Find and Replace as below:
^p
^p+"
for End of the line, Find and Replace as below:
^p
"^p
for beginning of the line, Find and Replace as below:
^p
^p+"
for End of the line, Find and Replace as below:
^p
"^p
DBC (Database Configuration) scripts are a powerful way to customize your system, such as adding new attributes to existing objects. In this post, we’ll walk through practical examples, including creating a custom attribute in the Asset object and generating DBC scripts from an autoscript
Suppose we want to add a Maintenance Cost attribute to the ASSET object. Here’s the step-by-step process:
Create a folder to store your DBC script:
Create a new DBC file aq_add_cost_to_asset.dbc in the folder:
There was a requirement of Month Parameter to be added on report runtime. The Month was already handled in the report query but we need standalone lookup just for month selection. But Maximo didn't allowed standalone lookup without linking attribute to the parameter.
So we ended up with the below solution to add add Standalone Lookup Using Relationship - Birt Report Parameter (Without New Attribute).
Steps:

Extract the First Day of this Week
1. Go to DATA, Add new columns,
Get Current Date Time
= TODAY() // current datetime
Get Current Day, Month, MonthName, Quarter, Year etc
= TODAY() // current datetime
= mytable[datecolumn].[Quarter]
= mytable[datecolumn].[Day]
= mytable[datecolumn].[Month]
= mytable[datecolumn].[Year]
todayname = format(today(),"dddd") //format to extract the Name of the date.
weekDay= WEEKDAY(TODAY()) //return the day number, it can take 1,2,3 as parameter to start the count from saturday, sunday or monday.
firstDayofThisWeek = today() - WEEKDAY(TODAY()) +1 //today - number of day +1
Get the Last Day of the Week
lastDayofThisWeek = today() - WEEKDAY(TODAY()) +7 //today - number of day +7
firstDayofThisMonth = STARTOFMONTH(TODAY()) //START OF MONTH
Get the Last Day of the Month
lastDayofThisMonth = ENDOFMONTH(TODAY()) //END OF MONTH
Populate a table/column with dates in a range
ourdates = calendar(date(2022,01,01) , date(2022-01-31) ) //first and last day as parameter
Deleting error messages requires two actions.
First the DELETEFLAG must be set to 1, then the status changed to RETRY.
Both of these are done transparently when deleting a message in the Message Reprocessing application. In an escalation they must be done in the correct order.
Warning: Be very careful when using this escalation to delete held messages. If valid transactions are sent in while this escalation is active, and they fail due to a correctable error, they can be deleted.
In the Escalations application, create a new escalation.
Applies To: MAXINTERROR
Condition: status=status='HOLD' and queuename = 'jms/maximo/int/queues/sqout'
Add an escalation point and check the Repeat box.
Add an action. Use the lookup arrow to Go To the Actions app to create the Action.
Create a new Action with the following values:
Object: MAXINTERROR
Type: Set Value
Value: 1
Parameter/Attribute: DELETEFLAG
Save and Return with Value to the Escalations application.

1. Create a non-persistent object NP_BULKUPDATE with 2 fields ATTRIBUTEVALUE, ATTRIBUTENAME.
<dialog id="NP_BULKUPDATEDIALOG" label="NP_BULKUPDATEDIALOG" mboname="NP_BULKUPDATE"><section id="NP_BULKUPDATEDIALOG_110"><sectionrow id="NP_BULKUPDATEDIALOG_111"><sectioncol id="NP_BULKUPDATEDIALOG_112"><textbox dataattribute="ATTRIBUTENAME" id="NP_BULKUPDATEDIALOG_114" /><textbox dataattribute="ATTRIBUTEVALUE" id="NP_BULKUPDATEDIALOG_115" inputmode="required" /></sectioncol></sectionrow></section><buttongroup id="NP_BULKUPDATEDIALOG_120"><pushbutton default="true" id="NP_BULKUPDATEDIALOG_121" label="OK" mxevent="dialogok" /><pushbutton id="NP_BULKUPDATEDIALOG_122" label="Cancel" mxevent="dialogcancel" /></buttongroup></dialog>
2. create a dialog in application designer and add the above 2 fields into any application, let's say in PR application.

3. Develop an OLP script on NP_BULKUPDATE before Add and good to go.
from psdi.mbo import MboConstantsfrom psdi.webclient.system.beans import ResultsBean# to get the non persistent objectmbo = mboset.getMbo(0)vATTRIBUTENAME = mbo.getString("ATTRIBUTENAME")vATTRIBUTEVALUE = mbo.getString("ATTRIBUTEVALUE")# get AppInstance object to retrieve UI properties list viewapp = service.webclientsession().getCurrentApp()# get the MboSet from the appparentSet = app.getResultsBean().getMboSet()#service.error('',str(app))# this is True if the Select Records check boxes are displayedisTableSelect = app.getResultsBean().getTableStateFlags().isFlagSet(ResultsBean.TABLE_SUBSELECT_ON)vParent = parentSet.moveFirst()while (vParent):# if Select Records is displayed we have to take action on selected records only# if Select Records is NOT displayed we have to take action on all recordsif vParent.isSelected() or not isTableSelect:vParent.setValue(vATTRIBUTENAME, vATTRIBUTEVALUE)vParent = parentSet.moveNext()parentSet.save()
Extension to my confirmation dialog upon deletion post but got the idea from Bruno's article which is here:
Add a confirmation dialog before deleting any line in PR application. So that user will have to enter the reason of deletion and it will be saved in worklog with all the related details like who deleted, reason of deletion, what was the item number and quantity at the time of deletion.

1. add one non-persistent attribute let's say NP_REASON in the PR object.
2. Make/add a dialog in PR.XML, add NP_REASON attribute
<dialog id="deletedialog" label="deletedialog"><section id="1567883350896"><sectionrow id="1567883359616"><sectioncol id="1567883366027"><statictext align="left" id="1597323707588" label="Are you sure, you want to delete this line?"/><textbox dataattribute="PRNUM" id="1567883419910" inputmode="readonly"/><textbox dataattribute="iTEMNUM" id="1597321688221" inputmode="readonly"/><textbox dataattribute="NP_REASON" id="1567892172806" inputmode="required"/></sectioncol><sectioncol id="1567883367821"/><sectioncol id="15678833596162"/></sectionrow></section><buttongroup id="mydialog_2"><pushbutton default="true" id="mydialog_2_1" label="OK" mxevent="dialogok"/><pushbutton id="mydialog_2_2" label="Cancel" mxevent="dialogcancel"/></buttongroup></dialog>
3. In PRLINE tab using application designer, edit the delete button properties and modify the event property to the newly created dialog (deletedialog) as below:
event: deletedialog
4. Write an ALP automation script on PR.NP_REASON attribute, the body is as below:
vWORKLOG = mbo.getMboSet("PR.WORKLOG")line = vWORKLOG.add()line.setValue("LOGTYPE","CLIENTNOTE")line.setValue("DESCRIPTION",str("Item:")+mbo.getString("itemnum")+str(" Qty:") + mbo.getString("ORDERQTY") +str(" UnitCost:") + str(mbo.getDouble("unitcost"))+str(" Reason:") + mbo.getString("NP_REASON"))line.setValue("SITEID","KAUST")line.setValue("RECORDKEY",mbo.getString("prnum"),2L)line.setValue("CLASS","PR",2L)mbo.delete()mbo.save()
Some times we restore our production database to other development environment, but its a best practice to disable few things first before we run the application. one of the examples is to stop the email/communication templates.
2 tables are handling System Properties in Maximo:
1. SELECT * FROM MAXPROP;
2. SELECT * FROM MAXPROPVALUE;
Below example to find the SMTP host which is used to send emails from Maximo. We can update this property to disable the emails.
SELECT MAXPROP.PROPNAME, MAXPROP.DESCRIPTION, MAXPROPVALUE.PROPVALUE
FROM MAXPROP join MAXPROPVALUE ON MAXPROP.PROPNAME = MAXPROPVALUE.PROPNAME
WHERE MAXPROP.PROPNAME = 'mail.smtp.host'
There is one system property as below, just set it to True
mxe.webclient.activitydashboard = true
And use this URL to access Activity Dashboard:
http://<hostname>:<port>/maximo/webclient/utility/profiler/PerfMon.jsp
Enabling PerfMon will significantly degrade server performance and so it should not be left enabled any longer then necessary to troubleshoot performance problems, especially on a production server.
Reference: https://www.ibm.com/support/pages/node/1133601

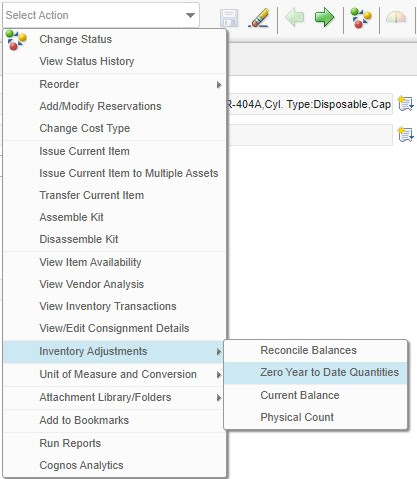
It's one of the task of Store Manager; to reset it and roll the counter one year down.
Maximo gives us 3 counters, Last year , 2 Years ago and 3 years ago as depicts in the right image.
There is an option is the Select Action menu as below:
Another way in the SQL condition while creating Relationships in Maximo:
get all synonym values of CLOSE,CAN from work order status
:&synonymlist&_wostatus[CLOSE,CAN]
is equivalent to
SELECT VALUE FROM SYNONYMDOMAIN WHERE DOMAINID = 'WOSTATUS' AND MAXVALUE IN ( 'APPR')
Usage:
Let's make a relationship and enter this condition within a where clause;
Other useful bind variables are here:
&USERNAME&, &APPNAME& and other special bind variables you can use (ibm.com)
To add an external Hyperlink to the Help Menu in Maximo.

1. Export MENUS.xml from Application Designer application.
2.Open it in any text editor and search for <menu id="HELP">
3. Now add this line at your choice as below:
<menu id="HELP"><menuitem event="maximohelp" id="tophelp" image="menu_icon_apphelp.gif" label="IBM Knowledge Center" licensekey="EAMTOPHELPMENU" value="mxe.help.maximohelplink"/><menuitem event="apphelp" id="help1" image="menu_icon_apphelp.gif" label="Help"/><menuitem id="IBMesupport" label="IBM Electronic Support"><menu id="IBMesupportsub"><menuitem event="loadlink" id="esupportmam" label="Asset Management Online Support" link="http://www.ibm.com/support/docview.wss?uid=swg21418666&ibmprd=tivmx7"/><menuitem event="loadlink" id="esupport3" label="IBM Support Assistant" link="http://www.ibm.com/software/support/isa?ibmprd=tivmx7"/><menuitem event="loadlink" id="esupport4" label="Support Portal" link="http://www.ibm.com/support/entry/portal?tivmx7"/><menuitem event="loadlink" id="esupport5" label="My Notifications" link="http://www.ibm.com/support/mynotifications?ibmprd=tivmx7"/><menuitem event="loadlink" id="esupport6" label="Cloud and Smarter Infrastructure Software Training and Certification" link="http://www.ibm.com/software/tivoli/education/index.html?ibmprd=tivmx7"/><menuitem event="loadlink" id="IBMcorp" label="IBM Corporation" link="http://www.ibm.com"/><menuitem event="loadlink" id="Google" label="Google Search" link="http://www.google.com"/></menu>

Create a simple script in Maximo and Call the Maximo Rest API request to post/get the data.
Let's create a simple automation script, it will create an SR with minimal information.
1. create a script in automation script application with below code:
from psdi.server import MXServer;srSet = MXServer.getMXServer().getMboSet("SR", MXServer.getMXServer().getSystemUserInfo());newSR = srSet.add();newSR.setValue("TICKETID", request.getQueryParam("ticketid"));
newSR.setValue("DESCRIPTION", request.getQueryParam("description"));srSet.save();
2. Now send below request from Postman or any other tool:
http://localhost/maximo/oslc/script/createjsonsr?_lid=maxadmin&_lpwd=maxadmin&ticketid=123&description=test ticket
or We also can send the data in payload
POST http://localhost/maximo/oslc/script/createjsonsr
MAXAUTH <encoded 64bit>
{"ticketid" : "123456","siteid" : "BEDFORD","description" : "test SR from http call"}
parameter appended in query string after (?)
request.getQueryParam("variable")
To get the user info from the request
request.getUserInfo()
read and parse the request to get the payload.
In the continuation of my last post "integration with Survey Monkey through Zapier".
I had another requirement to implement a customization to directly call the external API of Survey Monkey from Maximo.
Below are the 2 steps procedure, first is the list of APIs we are going to call in a sequence from Maximo Automation Script, and then the detail code I used.
Prerequisites:
A. Three APIs we are going to call for this project from Automation Script:
{"type": "invite","subject": "Survey for the Ticket {{myextrafield}} {{CustomData1}}","is_branding_enabled": true,"embed_first_question": true}
{ "email": "abdulqadeer.el@gmail.com", "custom_fields": { "1": "c1"}, "extra_fields": { "myextrafield": "1234" } }
{ }
To read from any webservice/rest as a client, just use below code to call any existing endpoint with http handler.
from java.util import HashMap,Calendar
from com.ibm.json.java import JSONObject
response=service.invokeEndpoint("SURVEY-endpoint name",map,body1)
body = JSONObject.parse(response)
mbo.setValue("description",response[:200])
#mbo.setValue("description",body.get("data")[1].get("email"))
Calling an external URL from Maximo Automation scirpt to achieve this requirement.
Requirement was; To send SurveyMonkey's survey to the EndUser/Customer when the status of Service Request is Resolved.
3 things we needs for this excerise:
1. Design a survey in Survey Monkey, Create Collector as Email.
2. In Zapier make a Catch Hook, get the API and append any parameter as query string (&ownerid) etc.
3. In Zapier make an Action to connect with Survey Monkey and trigger Contact Send.

We have two dates, the status date: rcareviewdate and Etc date:rcainprgdate. The script below calculates the duration in Hours excluding weekends between these two dates based on attribute status date change.
When we change the status it will calculate overdue for previous status ETC date and current status change date.
Launch Point Type: Attribute Launch Point
Attribute: CHANGEDATE
#Imports
from java.util import Datefrom java.text import SimpleDateFormatfrom psdi.mbo import MboConstantsfrom psdi.server import MXServerfrom java.util import Calendarfrom psdi.app.common import DateUtility#Milliseconds ConstantsMILLISECONDS_DAY= 86400000MILLISECONDS_HOUR = 3600000MILLISECONDS_MINUTE = 60000#Default hours and minutes valuesdays = 0hours = 0minutes = 0
The most common forms of authentication to use with REST API are:
|
System Property |
||
|
|
mxe.useAppSecurity |
0 |
|
URL call |
||
|
|
http://localhost/maximo/oslc/login |
|
|
Request Headers |
||
|
|
MAXAUTH |
<BASE64encoded user:password> |
|
Response in Return |
||
|
|
JSESSIONID |
As cookie to maintain the same session |
The Below System property tells us the application security is ON.
|
System Property |
||
|
|
mxe.useAppSecurity |
1 |
in LDAP Maximo uses directory authentication and validates users' credentials from the directory configured in WebSphere.
In this case, security settings are defined in WEB.XML file in below mentioned 4 files
maximo/application/maximoweb.xml maximo/application/maxrestweb.xml maximo/application/mboweb.xml maximo/application/meaweb.xml
in these files <login-config> section needs to be uncommented to use either FORM or BASIC authentication.
To track or find the messages in the message tracking application is sometimes very difficult. But we can tweak this by extracting and displaying some of the message information in the External Message column in the list view. This way it will be helpful to find the relevant message.
For instance: Let's say that we have an inbound message utilized by continues cron on the WORK ORDER object.
Message tracking is also enabled, we can see the work order number in the list view by putting this string in the External Message ID configuration as below:

In the services > Select Action > Message Tracking > enable message tracking and
enter below into External Message-Id:
operation/integration-object-set/main-MBO/attribute with namespace as in the below example
{http://www.ibm.com/maximo}SyncWORKORDEROS/{http://www.ibm.com/maximo}WORKORDEROSSet/{http://www.ibm.com/maximo}WORKORDER/{http://www.ibm.com/maximo}WONUM

An example of Db2-SQL to find the next working day and skip the weekend. In this example Friday and Saturday both are weekends.
SELECTsysdate AS current_date,DAYNAME (sysdate) current_day,sysdate + 3 AS come_after_3_days,DAYNAME (sysdate+3) oh_after_3_is_friday,decode(DAYNAME (sysdate + 3),'Friday',(sysdate + 3) + 2,'Saturday',(sysdate + 3) + 1,(sysdate + 3)) so_the_nextworkday_is,dayname(decode(DAYNAME (sysdate + 3),'Friday',(sysdate + 3) + 2,'Saturday',(sysdate + 3) + 1,(sysdate + 3))) AS so_the_nextworkday_is_sundayFROMsysibm.sysdummy1
To use the External Services in Maximo, or to integrate with an external system like MS Outlook 365, BIM by Autodesk Revit, or GIS, or any web/rest service.
All famous browser generally trusts almost all known Certificate Authorities (Digicert, Google Trust Services and so on.)
But when it comes to Websphere, it doesn't work. Only the Administrator specifically instructs WebSphere to trust by importing the certificate into the Trust Store either at the Cell level or Node level.
Let's instruct Websphere to import a Gmail certificate
Add an additional column in View History Dialog to see the time elapsed for each status.
This is a modified version of the solution written by Bruno for the same topic.
We will accomplish this task with an attribute in the status table and an object-level launch point script written in Jython.

1. Add a column in PRSTATUS table, Name: ELAPSEDTIME, Type: Duration.
2. Display this column into View History Dialog using the application designer of the PR application.
2. Write an Object Launch Point Script: Object: PRSTATUS , Save, Add, AfterSave. Copy below the body and paste it.
You have 15 business days (exclude weekends) to complete the task, what will be the 15thday?
from java.util import Calendar#Function definitiondef getNextBusinessDday(d, n ):cal = Calendar.getInstance();cal.setTime(d)loop=1while(loop<=n) :cal.add(cal.DATE, +1)if (cal.get(cal.DAY_OF_WEEK)) not in [cal.FRIDAY,cal.SATURDAY] :loop=loop+1vserial = loopcalculatedetc = cal.getTime()return calculatedetc#variables for inputd = mbo.getDate("changedate")n = 15#function call whereever you want in the same scriptgetNextBusinessDday(d,n)
Question:
Solution:
My answer is yes to all the above questions, let's start with this example.
--- " Do this job within 5 business days (excluding weekends (Friday, Saturday))! "
Okay. Today is 19-Jan, what is my, etc after 5 days.
we will handle this with 2 scripts:
from java.util import Calendarcal = Calendar.getInstance();cal.setTime(d)loop=1while(loop<=n) :cal.add(cal.DATE, +1)if (cal.get(cal.DAY_OF_WEEK)) not in [cal.FRIDAY,cal.SATURDAY] :loop=loop+1vNextBDay = cal.getTime()
2. Call this function from another script with 2 parameters d, n ( date, days)
Recently we had the requirement to disable the direct MR to PR automation. so instead of
creating direct PR from MR, the users will select a store on material requisition to reserve material
from store. When the MR is approved, the inventory usage is created from MR.
If the material is available in-store, storeroom will issue the material otherwise he clicks the option
to create Purchase Requisition (PR) from inventory usage.
So we developed this new functionality.
Note: This script contains a few custom attributes. I have commented those line, In your case please remove them.
Step 1:
First Add new Status for Inventory Usage Application: PR_CREATED
Step 2: Create Automation Script
Launch Point: ACTION
Object: INVUSE
Variable: v_mr
Binding Value: INVUSELINE[MRNUM is null].MRNUM*
Relations: INVUSE --> INVUSELINE -->MRNUM (child object:MR, mrnum=:mrnum)
