Saturday, 30 March 2019

Hide a Button in Maximo Using Signature Options with Conditions | IBM Maximo


In this example we are going make a "NEW ROW" Button of Tasks in Plan Tab of Workorder application
1.       Add/Modify a new Signature Options HIDENEWROW from application designer’s Action Menu

2.       In Properties of Button, Set Signature Option: HIDENEWROW, newly created in step 2
3.       In properties of button under signature option, set Sig Option Data Source ID: MAINRECORD
4.       In security Group grant and attach your condition (Make a condition e.g. hide when Reported by Mr. WILSON (:Reportedby = ‘WILSON’) or 1=0)

5.       Sign-out and Login again, you are done! J


Thursday, 28 March 2019

Default Type propery of Default Value control Application Designer | Maximo

What is default Type property of Default Value Control in Application Designer:

default type in default value control:

1  If you want a value to be defaulted in every new line, set INSERT
2. If you want to be copied from default table data attributes (if available like PR)  set DEFAULT
3. or if you want set a pre-filled filer in list view , set QUERY

Wednesday, 20 March 2019

Limit Classification in SR conditionally | IBM Maximo

Limit Classification in SR application based on conditional expressions:


1. Create a Global Data Restriction:


Object: CLASSSTRUCTURE

Application: SR

Limit Status in Your Custom Application | IBM Maximo

in Global Data Restriction or specific Security Group:

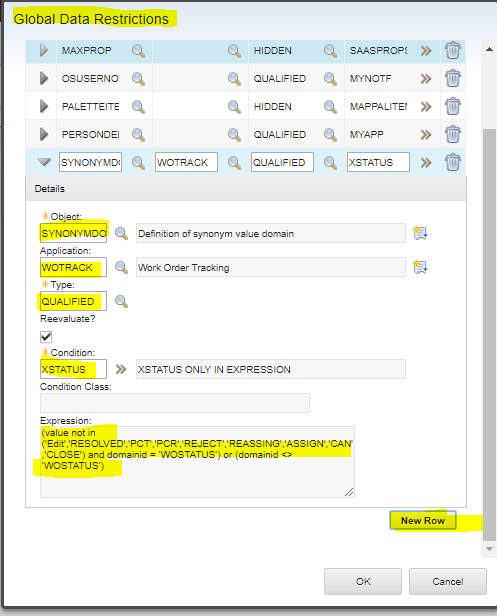
create a new object restriction:

OBJECT: SYNONYMDOMAIN
APPLICATION: XWORKORDER
TYPE: QUALIFIED
CONDITIONS: XWOSTATUS

EXPRESSION:
(value not in ('Edit','RESOLVED','PCT','PCR','REJECT','REASSING','ASSIGN','CAN','CLOSE') and domainid = ‘WOSTATUS’) or (domainid <> ‘WOSTATUS’)

Default Table Data in any Applications | Maximo

Add default table data to applications such a remarks and Default GL Account to the Inventory Usage application


  1. in Application designer, drag a Section, change label as "Default Table Data" or whatever your want, and change input mode as "Default"
  2. copy the Control ID of main Table and paste it into Data Source ID of new section created in step 1. 

Create Custom Dialog to get Input from User and perform Tasks | Maximo


  1. create a Non-Persistent Object(my_np_object) for the dialog interface
  2. create an empty relationship from the main object, say (workorder2my_np_object)
  3. create a dialog(mydialog) in presentation xml with the relationship (workorder2my_np_object)
  4. create an Action or button control to call the dialog event (mydialog)
  5. write OLP script on INIT of my_np_object, to set default values in dialog,(optional)
  6. write OLP script on before SAVE to perform action when dialog close. 


6. OLP on INIT script (optional):

mbo.setValue("ORGID", mbo.getOwner().getString("ORGID"))
mbo.setValue("SITEID", mbo.getOwner().getString("SITEID"))

7. OLP on Before SAVE 
mbo = mboset.getMbo(0)

# get the originator MBO
origWo = mbo.getOwner()

# perform your tasks here.


...


Guru Bruno also document it here in better details:
https://bportaluri.com/2019/08/custom-dialog-using-automation-scripts.html


Sunday, 17 March 2019

Rollup Cost from all Child lines into Parent as Total Cost | Maximo

Create a Object Launch Point


Object: ParentObject
Language: jython
Event:     Validate Application

Variables:
vSumLine    Rel_ChildObject.LINECOST*       
vtotalcost    TOTALCOST

Script:
if vSumLine is not None:
    vtotalcost = sum(vSumLine)
else:
    vtotalcost = 0.0

Thursday, 14 March 2019

Start Center and Result Set Wrapping | Maximo

If you have a horizontal scrolling in your start center just because of large description texts in your inbox assignment of result set portlets. you can control the large text by this


there is a system property to control this wrapping, by default the value is False.

webclient.shortenportlettext True
set it to True and make a live refresh.

Saturday, 23 February 2019

Primary Vendor attribute vs Default Vendor checkbox in Reorder Tab | Maximo

In inventory application, Reorder tab:

1. Primary Vendor is an text field 
2. Default Vendor is a check box in Vendors section to select one vendor as default. 

above mentioned both type are separate in Maximo although they seems identical. 

1. Maximo will take the precedence to the Vender entered in Primary Vendor while reordering, (its a process to manually select any vendor for the item ). If and only if the primary vendor is not entered, then it will take default vendor from vendors list attached to this item. Primary vendor is identifier of the primary vendor for the item. 
You will notice that whenever you select any company in primary vendor field and Maximo generates a new row in vendors section in bottom of Reorder Details tab. 

2. Default vendor check box in Vendors Section, you may enable only one default vendor in inventory/reorder details/vendors section but you can add/attach as much vendor as you can with the one item. If the check box is selected, this will be the default vendor used on Work Order Planned Materials and Services lines for direct issue requisitioning.


reference: https://www-01.ibm.com/support/docview.wss?uid=swg21470910

Thursday, 14 February 2019

Excel: Increment Numbers Based on Another Column(Criteria) when Value Changes | Windows

apple 1
apple 2
apple 3
mango 1
mango 2
coco 1
coco 2
coco 3
coco 4
vanila 1
vanila 2

=IF(B10<>B9,1,C9+1)
or

=COUNTIF($A$2:A2,A2) 

to under what the $ sign is in excel forumula, please visit this: https://www.quora.com/What-is-the-difference-between-a-2-a2-and-a2-in-Excel 

Result set as alternate of Inbox Assignment | Maximo

Create a result set as an alternate solution of Inbox Assignment; 
A logged in see thoes records which are assigned to him for a specific application.


create a save a query for SR:


ticketuid in (select wfinstance.ownerid from wfinstance join wfassignment on wfinstance.wfid=wfassignment.wfid and wfinstance.active = 1 and wfassignment.assignstatus='ACTIVE' and wfassignment.app='PLUSGSR' and assigncode in (:&USERNAME&))

Save it as Assigned_SR

create a result set on start center and attach this query with SR application, add your desired attributes to display.

and done :)

Wednesday, 13 February 2019

Notify requester of MR when Material is received | Maximo

Automatically Send an email to the user when the material is received and inspected in Maximo.


  1. Automation script to send email

Object Launch Point: MATRECTRANS, Attribute: STATUS

from psdi.server import MXServer
if vISSUETYPE == 'RECEIPT' and vstatus == 'COMP':
   # if not mbo.isNull("poline.mrnum"):
        user = mbo.getUserInfo()
        mboServer = mbo.getMboServer()
        commTemplateSet = mboServer.getMboSet("COMMTEMPLATE", user)
        commTemplateSet.setUserWhere("TEMPLATEID = 'RECEIVING' ")
        commTemplate = commTemplateSet.getMbo(0)
        commTemplate.sendMessage(mbo)

  1. Role, who will receive the email
Role: Receiving,  Type: A Set of Data Related to the Record
Object: PO 
Value: :POLINE.person.PRIMARYEMAIL
 

Saturday, 22 December 2018

Conditionally Attaching and Limiting any Domain through Automation Script | IBM Maximo

sometimes requirements are like we need to redefine a domain; lets say a table domain to any attribute, or we may want to change domain as the condition changes.

 suppose End user is only able to see item as per the storeroom dynamically and only the items with reorder is enabled while planning material in workorder application.


1. create a new Table domain
domain: WPITEM
validation: itemnum = :itemnum
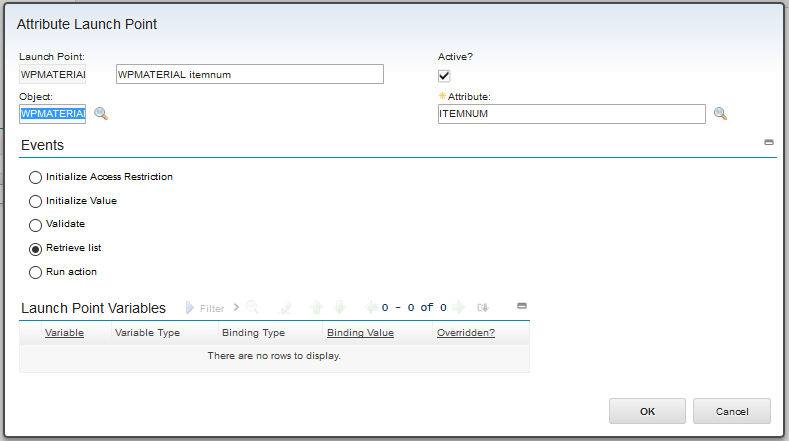
2. Write an Attribute Launch Point
Object: WPMATERIAL
Attribute: ITEMNUM
Events: Retrieve List

we will write the WHERECLAUSE in our script as per the conditions.


Maximo Reorder Formula Redesign | IBM Maximo

Few days ago we had a requirement to alter the default Reordering process used in Maximo. For that we came to a solution which is very simple through Maximo Automation Script but it takes us a lot of research to cater all the impacts and other issues.
In reorder process Maximo uses Reorderpad tables and ReorderMutex to lock other while reordering.


Saturday, 15 December 2018

Part 2. Create Condition Monitoring and Enter Meter Reading Values Using Rest API | IBM Maximo

In the previous post, we created meters and attached meters to asset. Today we will create condition monitoring record and enter meter values using Rest Api.

1. First step is to create object structure MX-MEASUREPOINT1. Add MEASUREPOINT object to it and add a child object of CHARPOINTACTION.
Object Location Path: MEASUREPOINT/CHARPOINTACTION
Relation: CHARPOINTACTION.

2. Create a new HTML file and paste a following code:
<html>
<body>
<form name="input" action="http://maxhostname:9080/maxrest/rest/os/MX-MEASUREPOINT1?_lid=wilson&_lpwd=wilson" method="POST">
    POINTNUM      <input name="POINTNUM" value="1111" type="text"> <p/>
    ASSETNUM                <input name="ASSETNUM" value="11245" type="text"> <p/>
    SITEID          <input name="SITEID" value="BEDFORD" type="text"> <p/>
    DESCRIPTION          <input name="DESCRIPTION" value="Vibration check" type="text"> <p/>
    MEASUREPOINTID     <input name="MEASUREPOINTID" value="" type="number"> <p/>
    METERNAME             <input name="METERNAME" value="VIBRATION1" type="text"> <p/>
    CHARPOINTACTIONID       <input name="CHARPOINTACTION.ID1.CHARPOINTACTIONID" value="" type="number"> <p/>
    VALUE <input name="CHARPOINTACTION.ID1.VALUE" value="High" type="text"> <p/>
    JPNUM      <input name="CHARPOINTACTION.ID1.JPNUM" value="JP-111" type="text"> <p/>
    PRIORITY <input name="CHARPOINTACTION.ID1.PRIORITY" value="" type="text"> <p/>
<input type="submit" value="Submit">
</form>
</body>

Sunday, 9 December 2018

Part 1. Create Meters and Attach Them to Assets in Maximo Using Rest API || IBM Maximo

We will start with create meters using rest API.

1. The first step is to create a new object structure MX-METERS and attach METERS object to it .


2. Create a new html file and copy and paste a code to it.

<html>
<body>
<form name="input" action="http://mxhost:9080/maxrest/rest/os/MX-METERS?_lid=wilson&_lpwd=wilson" method="POST">
    METERNAME                <input name="METERNAME" value="VIBRATION1" type="text"> <p/>
    DESCRIPTION                <input name="DESCRIPTION" value="Temperature" type="text"> <p/>
    METERTYPE          <input name="METERTYPE" value="CHARACTERISTIC" type="text"> <p/>
    DOMAINID               <input name="DOMAINID" value="HLM" type="text"> <p/>
    <input type="submit" value="Submit">
</form>
</body>

Thursday, 18 October 2018

How to Remove Excel VbaProject Password in XLSM file

1. open XLSM file with 7-Zip
export/drag xl/vbaproject.bin file somewhere in your computer

2. edit exported file vbaproject.bin with HEXEditor
find/replace "DPB" with "DPx"
save and import back it into 7zip xl/vbaproject.bin location
close 7zip.

3. open file with excel, it gives error press OK.
press F11 to open vba editor.

4. in Tools Menu > VBAProject Properties > Protection (T)
Uncheck: Lock project for viewing.
ok and save.


We are Done 😊


Friday, 12 October 2018

Database configuration formula | Maximo

Formulas are introduced from Maximo 7606 on ward, which leveraged us to make calculation related things easier as we were already doing it through auto scripts.

Although it is not new after 761 release but still not very common.

There are 2 types of DB formulas; attribute formulas and Object level formulas.

Below mentioned is one example of Attribute formula in database configuration.

In this example we write a simple Excel style IF condition formula.


Wednesday, 10 October 2018

IBM Cognos Contents for BI Report Development


What is Cognos connection
Examine Cognos connection UI elements – create a URL, Login, Logoff
Entry properties: General Properties, Permission, Report, Query, Analysis, Job, Agent and Page Properties
Navigation – Public and Private Folder
Open reports with report name, Go to links, Run reports from a view
Run Reports – Prompt Pages, Printing a report and Open in excel
View the run history of a report and historical reports
Closing and creating quick links to reports – my folder
Shortcut and browser bookmark
Metadata Modelling
Introduction to framework manager
Framework manager basics
User interface, navigation, objects